1.)ISE Setup
2.)AireOS Setup
3.)IOS-XE Setup
ISE Setup
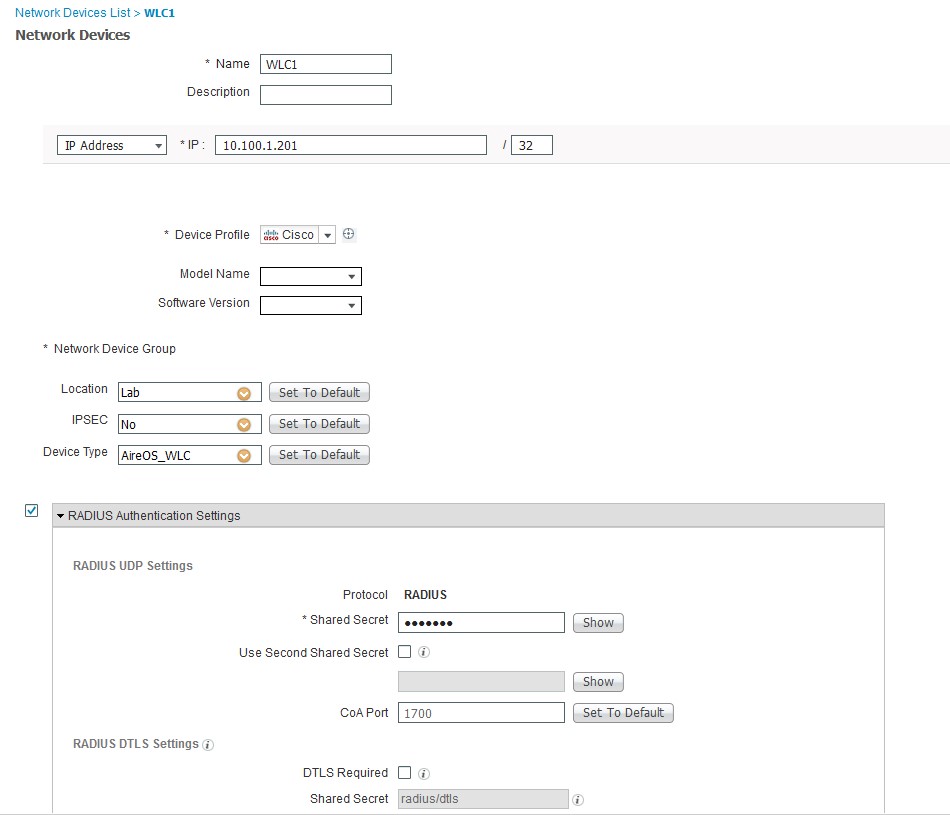
- Login to ISE and add the NAD for the WLC under Administration > Network Resources > Network Devices
- Click the Add button and enter the info:
- Name the name used for ISE to identify.
- Description if applicable
- Set to IP address and put in the IP/subnet mask (/32) for single device usage.
- If network groups are used, then change the location and device type. I have a lab location and AireOS_WLC type defined.
- Check the box for RADIUS (TACACS as well if using for device login) and enter a shared secret for the device.
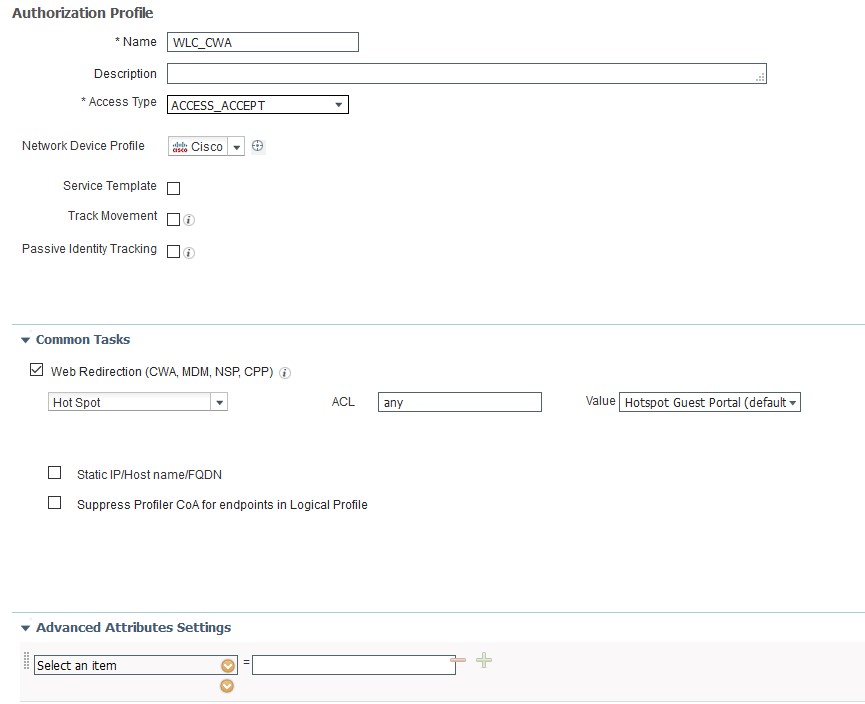
- Create the Authorization Profiles.
- Name of the profile
- under common tasks, find Web Redirection set to Hotspot for passthrough with guests, Centralized web auth for web auth using accounts. The ACL is the name of the ACL on the WLC to be used.
- Click Save.
- Create a Policy set
- Policy > policy sets
- Press the + on the Left side and name the Policy set and assign a condition such as Wireless_Access, which will match all wireless conditions and save then click the > on the right

- Under Authentication, Create a new policy for MAB, set the condition to Wireless_MAB, and use internal Endpoints with options as reject, continue, drop.

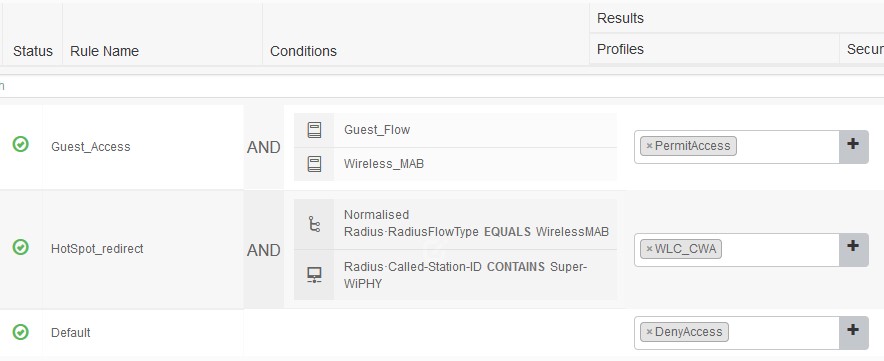
- Under Authorization Policy, create 2 1 for a permit and 1 for CWA redirect. And click save.
- Guest_Access – conditions Guest_Flow and Wireless_MAB with the Result of PermitAccess
- Hotspot – Normalised Radius·RadiusFlowType equals WirelessMAB and Radius·Called-Station-ID Contains SSID with Result of the WLC_CWA (created earlier)
The only Difference with IOS-XE is when adding as a NAD I use and IOS-XE group for setup with TACACS.
AireOS WLC Setup
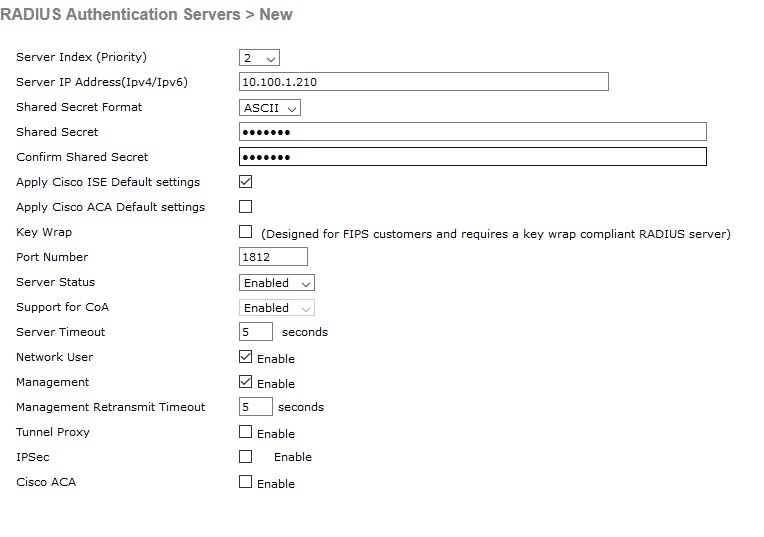
- Add the RADIUS server to the WLC under Security > AAA > RADIUS > Authentication > New
- Enter the IP and Shared secret of the ISE server and either check the “Apply Cisco ISE Default Settings” or Change the “Support for CoA” to Enabled.
- Create the WLAN under WLANs > Create New from the dropdown and then press go
- Enter the Profile Name, SSID, and WLAN ID.

- Edit the SSID by clicking the WLAN ID
- General Tab
- Set the needed radio policy
- Set the interface for the needed VLAN
- Security Tab
- Layer 2
- Set layer 2 security to none
- Enable Mac Filtering
- disable OWE Transition Mode
- AAA Servers
- set the servers to use the ISE nodes needed
- Layer 2
- Advanced Tab
- Allow AAA Override set to enable
- NAC state set to ISE NAC
- Click apply
- Create a new ACL to match the name in ISE for redirect under Security > Access Control Lists > New
- Edit the ACL by clicking its name and add the rules
- Permit ANY ANY to and from the DNS server
- Permit ANY ANY to UDP DHCP Server
- Permit ANY ANY from UDP DHCP Client
- Permit ANY ANY to and from ISE nodes
- Deny ANY ANY (implicit)

- If using Flexconnect, you will need to create the ACL as a Flexconnect ACL and then apply it to the group.
- Wireless > Flexconnect Groups > Click the name of the group > ACL Mapping >policies in the IPv4 Policy ACL, select the ACL needed and click add
IOS-XE Setup
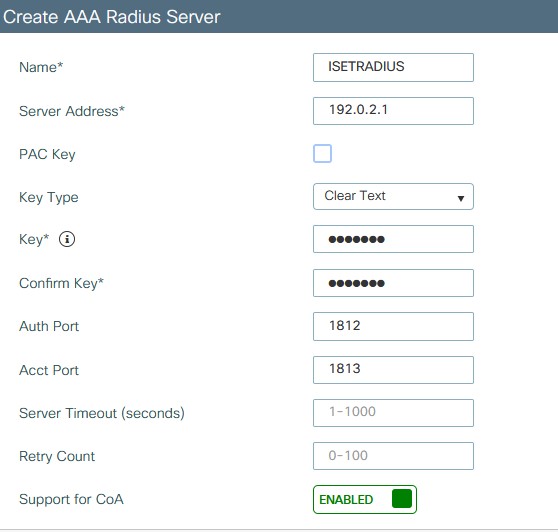
- Add the RADIUS server under Configuration > Security > AAA > Servers/Groups > Radius Servers
- Creating a server group here allows for multiple servers to be used via name rather than adding each one later.
- Create the server making sure that Support for COA is enabled
- apply to device
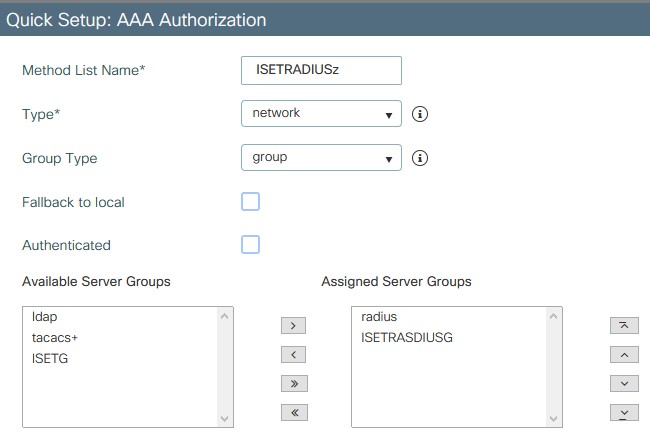
- Configuration > Security > AAA > AAA Method List > authorization
- Add a new method list using just radius or use the server group crated for specific servers.
- Apply to device
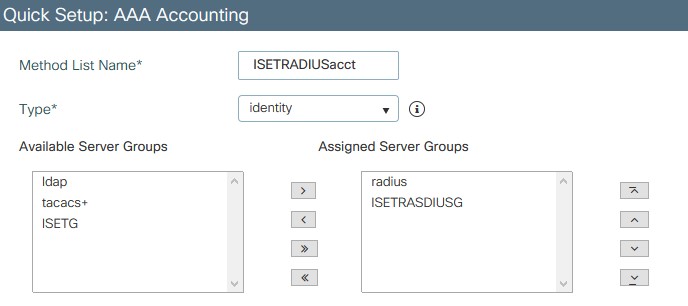
- Go to accounting and add a method there as well using either the default radius or the server group.
- Apply to device
- Add a new method list using just radius or use the server group crated for specific servers.
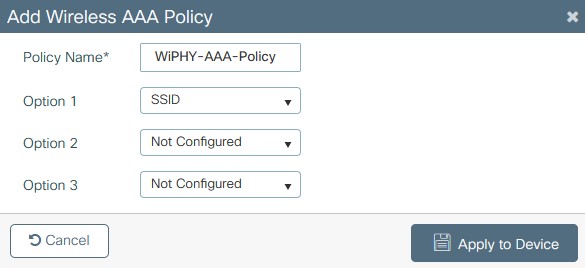
- Create a new Wireless AAA Policy under Configuration > Security > Wireless AAA Policy (you can also just change the default policy as well). Set option 1 to SSID then apply to device.
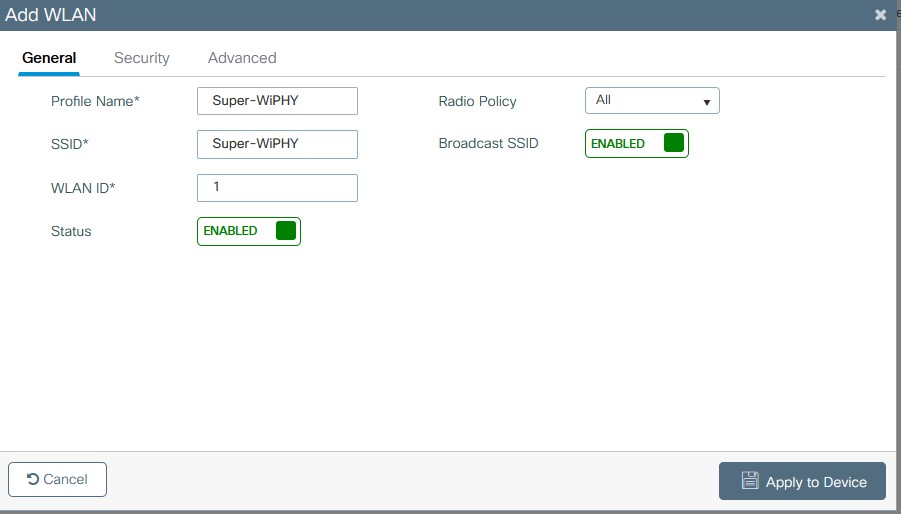
- Create the WLAN under Configuration > Tags & Profiles > WLANS > add
- on the General tab define the profile name, SSID, WLAN ID, and set the status to enable.
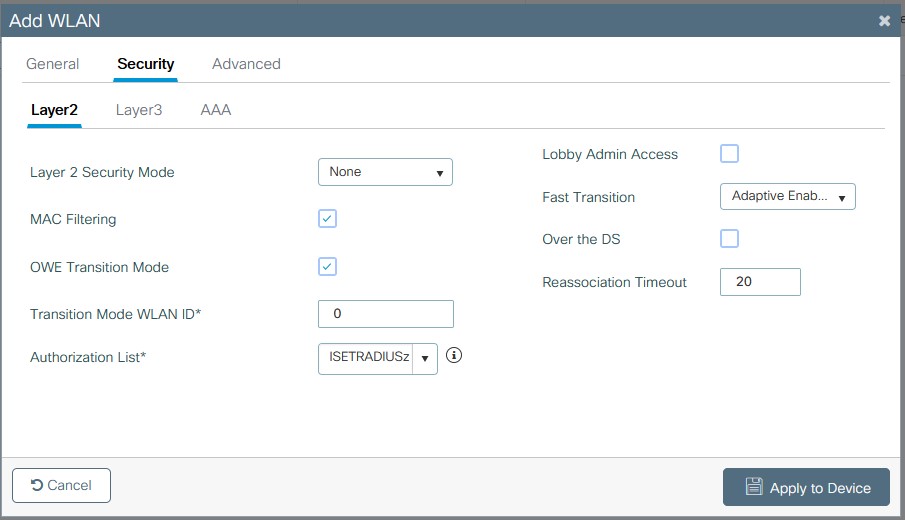
- On the Security tab, layer 2 set the security mode to none, enable MAC Filtering, and set the Authorization list to the method created in step 2
- Apply to Device, unless more settings are needed for customization.
- on the General tab define the profile name, SSID, WLAN ID, and set the status to enable.
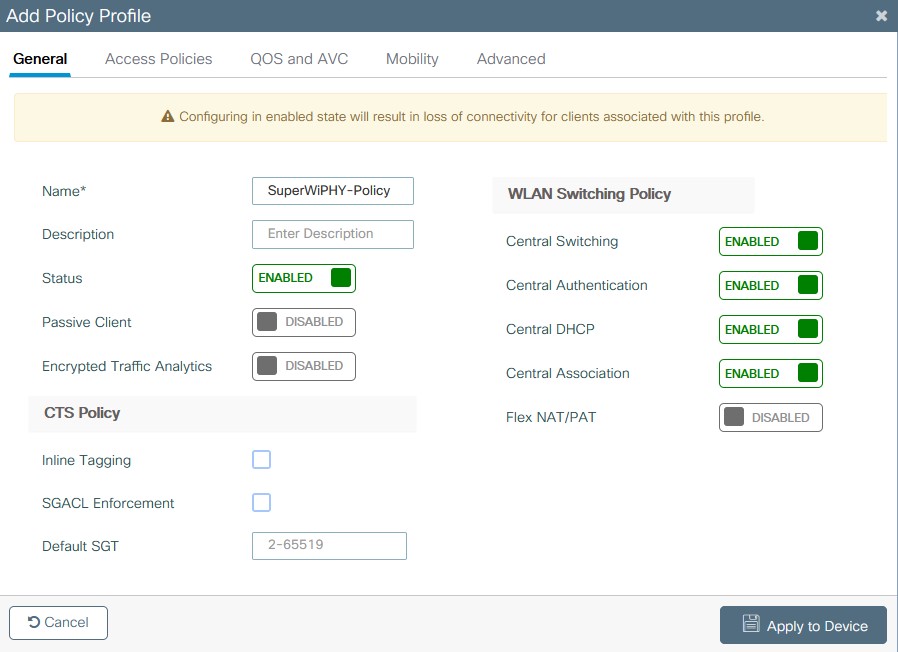
- Create a Policy Profile under Configuration > Tags & Profiles > Policy > add
- On the General Tab name the Policy and set the status to enabled.
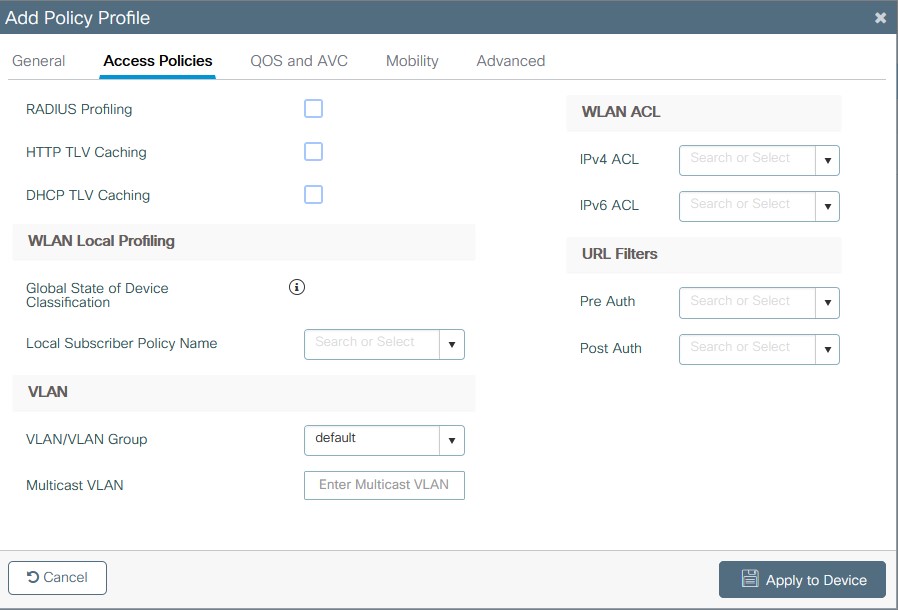
- On the Access Policies Tab set the VLAN to be used for the WLAN.
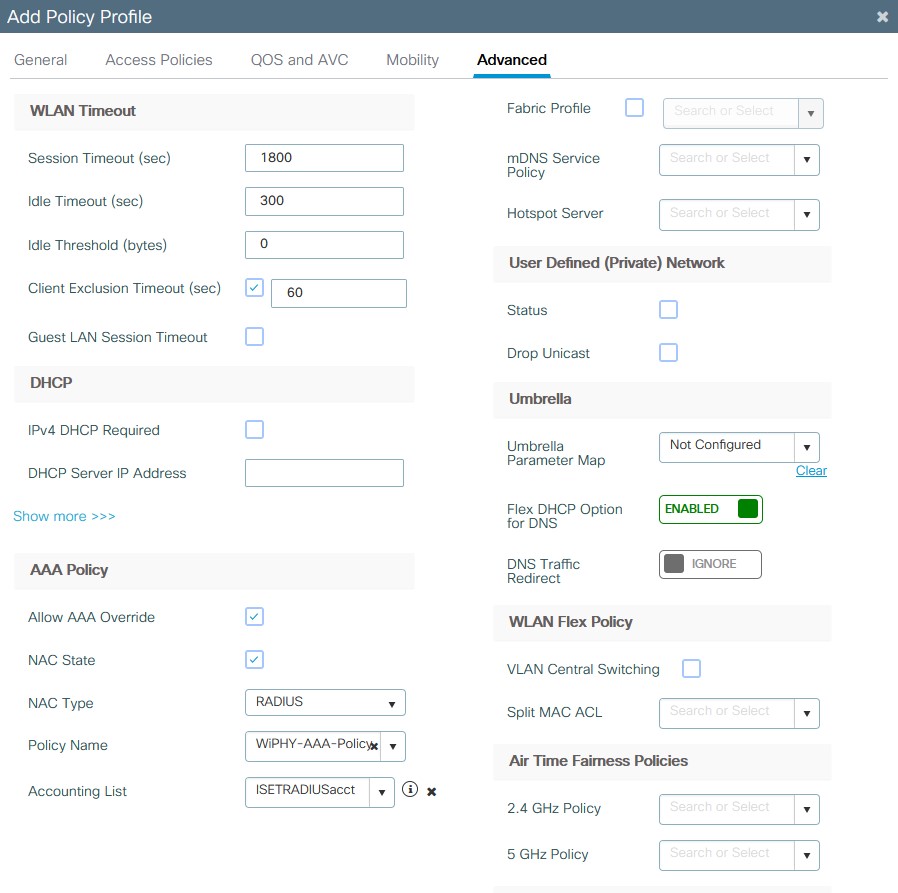
- On the Advanced TAB check “Allow AAA Override and “NAC State”. Set the policy name to the policy created if not using the default and accounting list to the list made in step 2.
- Apply to Device, unless more settings are needed for customization.
- On the General Tab name the Policy and set the status to enabled.
- Create the Policy Tag under Configuration > Tags & Profiles > Tags > Policy > add
- Name the Policy Tag
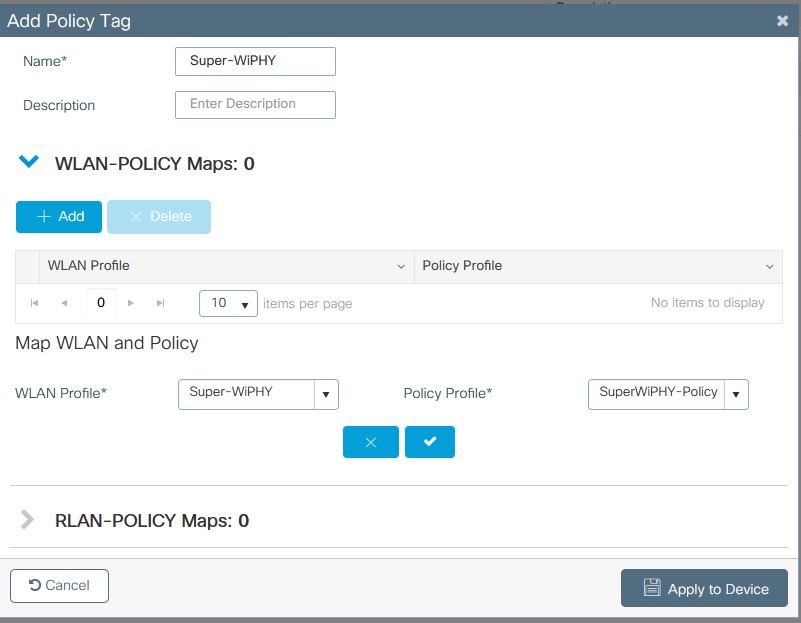
- +add to add a WLAN and select the WLAN profile and Policy profile previously created. Click the check and then apply to device.
- To TAG the ap see my section on AP tagging.
- Create the redirect ACL in Configuration > Security > ACL > add
- This has to match the ACL name that was entered into ISE on the authorization results.
- Add the following for basic setup using IPv4 Extended:
- Deny ANY <ISE PSN> IP
- Deny <ISE PSN> ANY IP
- Deny ANY ANY UDP none DNS
- Deny ANY ANY UDP DNS none
- Permit ANY ANY TCP none WWW

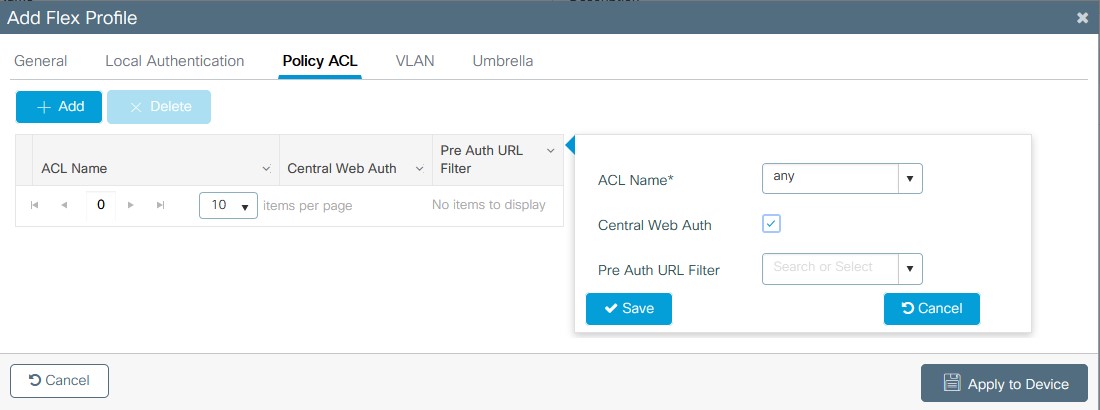
- If using Flexconnect on the 9800 you will need to setup the Flex profile to distribute the ACL. Go to Configuration > Tags & Profiles > Flex > add
- on the general tab name the flex profile and setup the native VLAN if not already created.
- on the policy ACL tab click add and then from the drop down select the ACL created in step 8 and then check the “Central Web Auth” box and click save, then apply to device.
